How to make classic logo design in corel draw
In this instructional exercise you will figure out how to outline a great red and gold insignia kind of logo with Corel Draw. This top to bottom logo plan instructional exercise incorporates ventures on outlining a brilliant casing, logo body, red lace and brilliant highlight. This logo can be utilized as an identification, token, emblem and will look great on a name, hail, stationary and so forth. This sort of logo functions admirably for vintage, exemplary use, as it has a rich great feel. You can likewise download the free source petition for this marvelous logo outline layout.


Step 1 : Basic Elements
Above all else you need to utilize CorelDraw with form 11+. In this instructional exercise I utilize CorelDraw X5.
Approve lets begin. We should investigate the essential components used to make our outline :
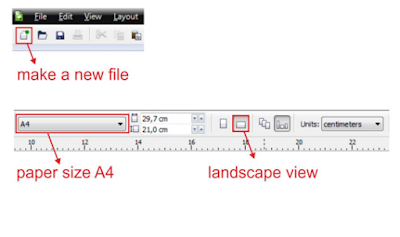
Step 2 : Creating Worksheet
Approve, now that you know the means and components, we will start.
Above all else open your CorelDraw program. Presently make another document and set the paper size to A4.

Step 3 : Creating Golden Frame
Since we have our worksheet set, now we will start to make the Golden Frame, utilizing "Oval Tool ".
Go to the "Oval Tool ", you can discover it on the left toolbar, make a circle shape and after that make the circle shape resized into 8 x 10 cm.

Make a second hover inside the first circle utilizing the " Ellipse Tool ".
Resize the second hover to 7,5 x 9,375 cm.

Make a third hover inside the first and second circle utilizing " Ellipse Tool ".
Resize the third hover to 7,5 x 9,375 cm.

Step 4 : Coloring the Golden Frame
Presently how about we place shading in the Golden Frame :
Select the principal circle which is the greatest one. Go to the Right Toolbar, there you will discover "Shading Palette".
Right Click on the yellow palette so as to change the circle line shading to yellow.

Presently select the second circle. Go to the Fountain Fill Tool, which is in the left base toolbar.
Pick Custom fill on the shading mix and make the sort Linear.
Presently you will see a shading box. You can change the shading by left-clicking it,
fill the shading with Gold on the left, Pale Yellow in the center and Gold on the privilege.
You can make a custom fill by double tapping at the shading box.
Fill the shading with Light Yellow on the center left, and another Light Yellow on the center right.
Two custom hues in the center will make the shading inclination gentler.
Make the Gradient Angle to 90, which will make the inclination even.

In the event that you doing it right it will look like picture beneath.

Presently gives put a chance to shading in the third circle, select it and go to the Fountain Fill Tool,
Pick Custom fill on the shading mix and make the sort Radial.
In the shading box. change the shading by left-clicking it,
fill the shading with Darkest Red on the left, Dark Red in the center and Red on the privilege.

On the off chance that you doing it right it will resemble this.

After that we are going to make the R textual style inside the red circle,
in this instructional exercise i utilize " English Vivace ", you can transform it to whatever you like.
Go to the " Text Tool " its in the left toolbar, left snap anyplace on the screen and sort it.


Comments
Post a Comment