Posts

Showing posts with the label Corel draw

How to professionally design a flag with free software

Image
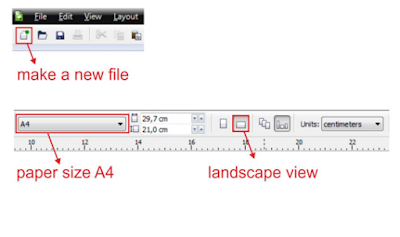
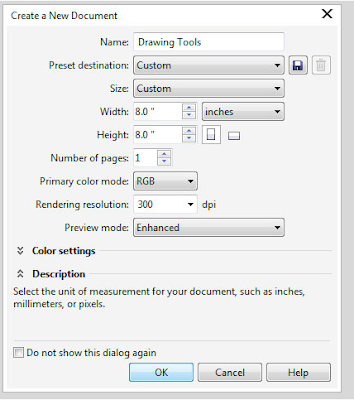
Open the layout record with CorelDraw and check the plan determinations  When you finish the product establishment, you ought to have the capacity to open the format by tapping on the downloaded document. Perused the determinations precisely before beginning. You won't not be acquainted with every one of them right at this point. Yet, don't stress, you will comprehend them before the end of this instructional exercise. Outlining your adjustable banner  On account of the full-shading advanced printing innovations, we can include any kind of logos and writings to our banners. Yet, remember that the banners are seen from a separation. It will demolish your banner in the event that you include excessively numerous subtle elements. By and large, individuals read an outside promoting banner in 5 seconds. The banner outline comes up short in the event that you can't pass what you need to your potential clients in 5 seconds. On the off chance that you have no clue what

How to make classic logo design in corel draw

Image
In this instructional exercise you will figure out how to outline a great red and gold insignia kind of logo with Corel Draw. This top to bottom logo plan instructional exercise incorporates ventures on outlining a brilliant casing, logo body, red lace and brilliant highlight. This logo can be utilized as an identification, token, emblem and will look great on a name, hail, stationary and so forth. This sort of logo functions admirably for vintage, exemplary use, as it has a rich great feel. You can likewise download the free source petition for this marvelous logo outline layout. Step 1 : Basic Elements Above all else you need to utilize CorelDraw with form 11+. In this instructional exercise I utilize CorelDraw X5.  Approve lets begin. We should investigate the essential components used to make our outline : Step 2 : Creating Worksheet Approve, now that you know the means and components, we will start.  Above all else open your CorelDraw program. Presently ma

How to Use the Mesh Fill Tool in CorelDRAW

Image
The Mesh Fill Tool can be a standout amongst the most overwhelming vector instruments regardless of the program. In this instructional exercise we'll render a straightforward apple in CorelDRAW and utilize the Mesh Fill device to its fullest. We'll combine it with the Drop Shadow apparatus and Fountain Filled shapes to make a basic, semi-sensible apple instantly! 1.  Create the Basic Apple Step 1 Make a New Document and draw a hover with the Ellipse instrument (F7). Select the shape and Convert to Curves (Control-Q). Utilize the Shape apparatus (F10) to control the shape's hubs to get a greater amount of an apple-like shape. Level out the top or base. Maybe your apple has a thin base. The shape you make is up to you. Step 2 In the Object Properties docker, set the protest's fill shading to splendid red. Utilize the Mesh Fill apparatus (M) to apple a work to the question by double tapping on the protest's edge and applying a darker red to that edge in

How to Use the Mesh Tool in CorelDRAW

Image
The Mesh Tool in CorelDRAW can help you make some awesome impacts, however it can likewise be somewhat mind boggling to utilize. So in this short video instructional exercise from my late CorelDRAW course, I'll demonstrate to you generally accepted methods to make a mesh object and alter the hues, properties, and hub area. At last, we'll render a basic circle together. Watch the Full Course In the full course, Getting Started With CorelDRAW, you'll become more acquainted with the devices, dockers, and other phenomenal elements of CorelDRAW x7. We'll cover every docker, exploring some usually utilized ones, and demonstrate a composed perspective of the UI. We'll likewise experience the way toward making brushes, examples, and PowerClips, all of which are generally utilized as a part of other vector programs. In the last part of the course we'll make a venture utilizing large portions of the instruments, dockers, and strategies secured in past lessons, p

Learn Advanced Techniques in CorelDRAW

Image
In Advanced Techniques in CorelDRAW, you'll investigate a scope of CorelDRAW's elements in an exceptionally reasonable manner, by making a computerized still-life scene starting with no outside help. What You’ll Learn With the assistance of Envato Tuts+ educator Mary Winkler, you'll learn propelled rendering and vector strategies, including: making and utilizing custom sprayer brushes utilizing inclination cross sections to render shapes and questions utilizing slopes and other intuitive apparatuses to render objects utilizing surfaces and content to add brisk points of interest to a representation You will principally utilize essential shapes to fabricate an advanced still-life scene, permitting you to concentrate more on lighting and shadow and less on drawing. You will figure out how to adjust your plan with a symphonious shading palette and play around with piece. At last, you'll have delineated a still life that is totally made up, yet holds a semi

CorelDRAW: Basic Drawing Tools

Image
Whether you're new to vector, or you're an Adobe Illustrator client extending your vector skylines, taking in the fundamental apparatuses of CorelDRAW is a commendable undertaking. We're going to begin with drawing instruments, for example, the Pen Tool, Freehand Tool and 3-Point Curve Tool, and additionally an audit of some regularly used dockers and toolbars. 1.  The Pen Tool Step 1 Begin by creating a New Document (Control-N) at your favored work measure (you can change this at whatever time while working), in RGB shading mode, and at 300 dpi. These are my favored settings, yet in the event that you'd rather work in CMYK for printing purposes, do as such (while recollecting to switch to RGB when trading for web utilize). Step 2 We should begin with the Pen Tool (you'll see it in the Toolbox, to the left, under the Bézier Tool). This apparatus works simply like the Pen Tool discovered in Adobe Illustrator and Adobe Photoshop. You put Nodes and

what is Corel draw tool box and its functions

Image
There are numerous devices in the tool compartment to draw or plan. Tool kit Coreldraw format you can find in Layout Coreldraw. Symbols that seem just a divide of the current. With the extensive symbol in the tool kit we should ponder, what is the capacity of these devices, how about we read for the inquisitive clarification of the capacity tool kit Corel. Pick tool=    its for selection, resize, and rotate toward the images object, Shape edit= It has a four point. shape= editing an image object shape. Smudge brush= alter/ disort the overal picture wth attractive shorelines. Roughen brush= alter/ disort the overal outline shape drawing by attractive. Free transform tools= Transform images objects using rotation (rotation) free. rotation angle, and rezize and also title the images shape.  Crop tool= Its also four points Crop= Eliminate the unwanted parts in the object. Knife= alter/ distort the overal picture with attractive shorelines. Erase= Remove the area in t